Tuesday, July 28, 2015

Batrep: Tourney Prep Tyranids vs Ultramarines

Marsh and I met for our usual Monday gaming at Titan. 1850 tourney lists - no quarter given. The following is the result of our 3 hour timed game. The models are pretty much WYSIWYG except for a few. 

Mission: Maelstorm + the Relic (15 points) 

Ultramarines won the roll off to choose table sides
Tyranids won the roll for First Turn so I took it

Flyrant on the ground is actually on the 2nd floor as it fell. 
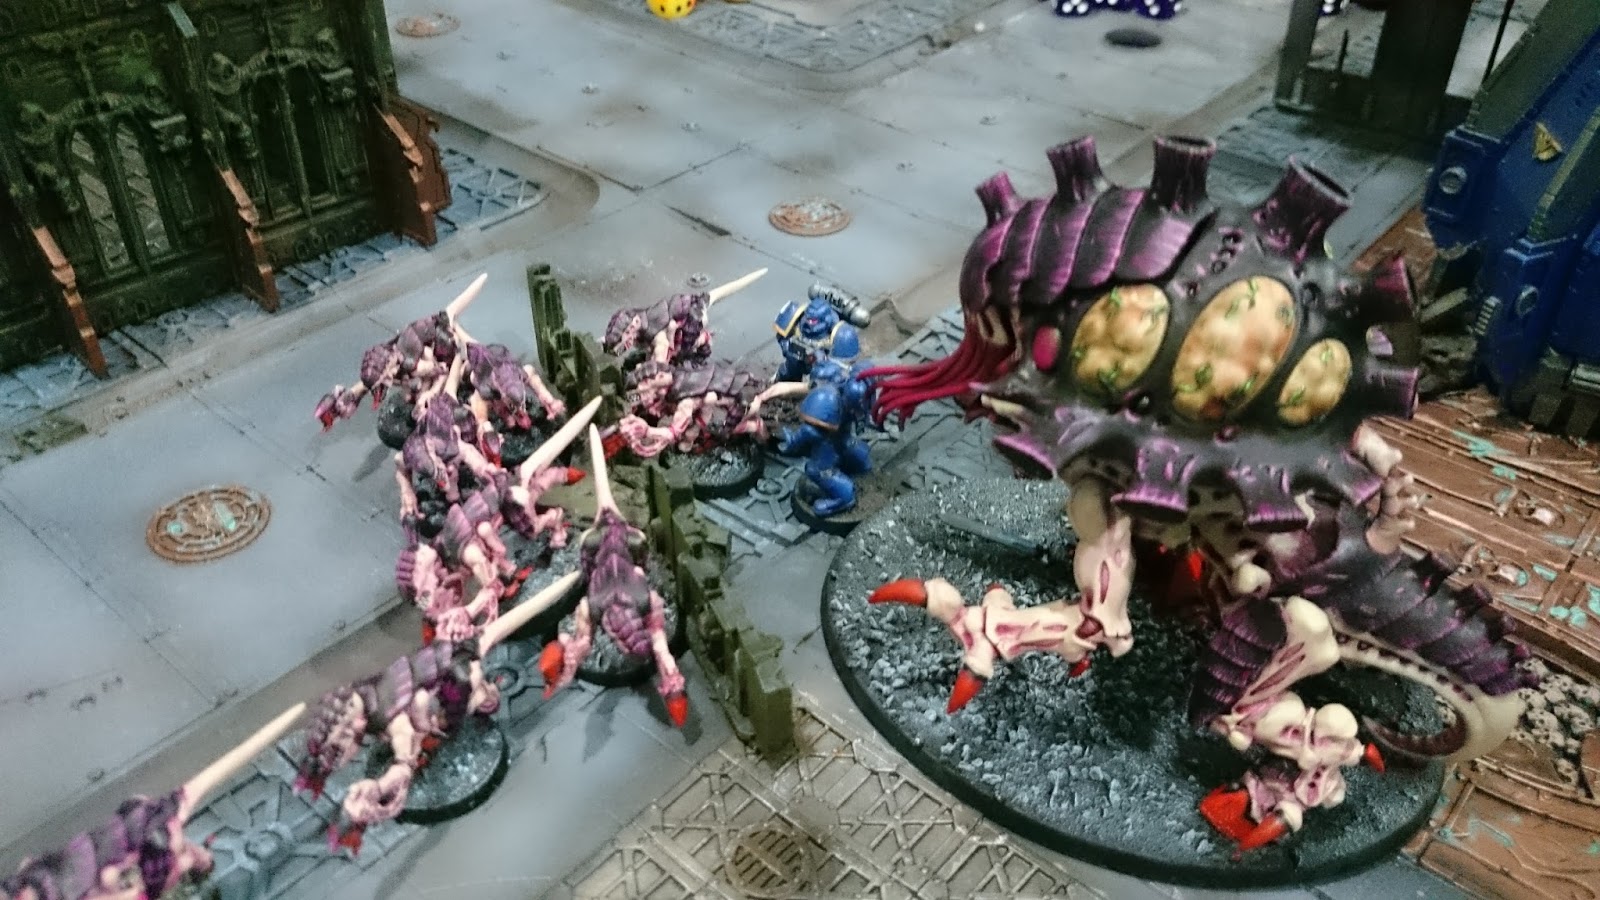
LAN secured the building on my side while my Venomthropes kept out of LOS.


Used the bases to indicate my Flyrants location on the ruins. Spread the Gants out to prevent the Marines from dropping in
Unfortunately for me I rolled 3D6 and got a Perils of the Warp. I failed my Grounding Check and took 2 wounds from one Psychic Phase. It was also the Warlord. I was now on the ground and the Marines had a full turn to shoot at him.

I managed to score these 2 VPs

Marines drop right in for the Relic (the barrels) and supported the 2 units with the Bikes
The Marines moved up to secure the Relic. They also took out my Warlord, giving Marshall First Blood and Slay the Warlord.


Marines scored these 2 VPs
Turn 2
Tyrannocyte came in with the Toxicrene
I was expecting the Grav Centurions to come in to take out my Tervigon so spread the Gants further out to blanket my backfield. Some moved up to assist with the Relic.

I charged the Gants into the Marines in the hopes of tying them up
This was probably a mistake. I had Secure Objective 2 in my hand and the Gants were already sitting on Objective 2. The Space Marine bikes were right in front of the Gants but were 7" away. The Tactical Marines were 3" away. If I stuck to the plan, I would have been able to engage the Bikes and still secure Objective 2. Ahhhh hindsight.

Mid field

Tyranids didn't manage to score any VPs for Turn 2

The Centurions come in and takes out the Tervigon, wiping a big part of my backlines
The Tactical Squad up front had also charged my Gants forcing them to consolidate upwards. This was also the Squad that had the Relic. Interesting choice.

Worth noting at this point that I kept thinking the Relic was captured by the unit and was not dependent on placement. Marshall did point to the Marine that was capturing it but it did not register with me almost until the end.

Marines wipe out the unit of Gants that charged them
The 2 Stormtalons that came in managed to take out my other Flyrant. Here's where I made a mistake. After the first Storm Talon did 2 wounds, I should have Jinked for the 2nd one.

Marines scored another 2VPs
Turn 3
I was losing my Synapse network and quite quickly too. I had also made a big boo boo in Turn 2. I had the opportunity to discard a card so could have discarded Secure Objective 6 (which my Gants were caught in combat with the Tactical unit) but held onto to it.  I should have discarded Objective 6 since Tactical Marines are quite difficult to shift unless I really commit to taking them out. Lesson learnt.

In hindsight, I should have pulled the Hive Guard back onto the Skyfire Objective 4. Jinking would not have made a difference as I was on Ruins which conferred a 4+ cover anyway. I held onto Scour the Skies because I did not expect the Flyrant to die from one round of shooting.

While I managed to fail the Synapse check on the Toxicrene, I was still able to move it towards the Relic Tacticals
The rest of my army attempted to create a no mans land between the Relic and the Marines, isolating the Tactical Squad holding onto the Relic. It was worth 15 points hence I was keen to get it.

Toxicrene charges in to take out a few Marines
 
In desperation I charged these Gants in but lost 1 for my troubles

Failed to score any
Note to self:  In this game, I continually forgot to consider discarding cards as I was hard pressed by time and felt bad holding it up. However, I have the right to consider dropping the cards. I will not be pressured into making decisions from now and will remember to drop the cards that I will struggle to score.

In the combat I finally managed to kill off the Tactical unit holding the Relic

Stormtalons were in my deployment zone now

Marshall scored another 2
Turn 4
I now had the opportunity to grab the Relic and win the game. However, 3 hours was up and since we were playing under tourney conditions, it meant the game would be called at the end of Turn 3. I couldn't take Turn 4 hence could not capture the Relic. A real waste!

End game shots

End game shots 2
We tallied the VP's from the Maelstrom cards and Marshall clearly came out on top, scoring 9 to my 2. I was determined to win this game by going for the Relic but was beaten by time. Would it have made a difference? Considering the Marines still had a lot of firepower, Marshall could have targeted the unit with everything he had and forced my Termagant to drop the Relic. Would it have made more sense to put it on the Toxicrene? Yes, very likely with T6 and natural Stealth. However, I wanted to use the Toxicrene to charge the other Tactical Unit and get away from the Centurions in my back line. My original plan was to get the Relic back to my lines using the Termagants and within Venomthrope cover. Assuming they survived the ThunderFire Cannon, that would have been game.

Well hindsight is powerful! Now let's play this mission again but this time with my other list. Let's see how it does. 

Monday, July 27, 2015

Slowburn: Month 2 and 3 Show & Tell

It is the end of the 3rd Month and we decided to meet for the Show & Tell on Saturday, 25th August at Titan Games. I brought my 750 list (basically everything I have committed and painted for the Slowburn League. Here are some pictures from the event. 

My Blood Angel led by Corbulo and Lemartes

Alan's Dark Eldar and Harlequin army

Tze Min's White Scars led by a Librarian

Davin's Dark Angels also led by a Librarian! 

Marshall called in the assistance of the Ultramarines since his Guard fled in the previous 2v2

Rico's beautiful Necrons

Just another shot of this army
Alan managed to score the best Story Teller and Painted award. It's too bad I didn't manage to get it!

Some of the astute among you will notice that there  are several players who have fallen to the wayside and failed to submit their completed pledges at the end of the month. I only hope that they are working for the 1k event. 250 per month is manageable if you plan it out. Looking forward to the 1k Event! 

Thursday, July 23, 2015

Slowburn: Blood Angels vs Adeptus Mechanicus

Got Pat into the store and we put our 750 point armies on the table. Pat was looking to try the Admech and I had my Slowburn army with me. I played the very same Take All Comers List while Pat brought a simple Admech list. All models are WYSIWYG. 

Mission: Spoils of War

Pat got the First Turn and took it. I failed to Seize. Night Fighting was in play.

Kept everything out of Line of Sight

Those Kataphron have a punishing amount of firepower and they are all Grav Weapons too! 
His first turn of shooting failed to do much as the Admech could only see the Scouts on the Bastion.

I moved the Death Company up again, hiding as much as I can

Scored 2 VPs

Gorro's Squad went to work but only managed to remove 2 HP from the Onager Dunecrawler
Gorro and squad failed and paid the price. The Admech turned their attention to the squad and kill them all giving First Blood to Pat.

Pivotal charge
I jump packed up within an inch from the Kataphron. Rolled 2D6 to charge needing a 6 to complete the charge. I rolled a 5. And now the Death Company is staring down the entire Admech army.

I managed to score another VP
In Pat's Turn 3 he managed to ping off 2 HP from my Sicaran the Blood of the Fallen. Other than that he moved some of his units forward to take out my Death Company and earned him Slay the Warlord.

And another 2 more in my Turn 3

Turn 4 saw the Admech popping off the Rhino

Keeping focussed on the objectives, I ran the Squad Rayzor to cap Objective 3 for another KP

Pat scored 2 VPs
In Turn 5 and 6, I took a massive beating. The Kataphron took off the remaining HP from the Sicaran and removed the unit of Tactical Marines. In the last turn, Pat managed to also kill off the Drop Pod who would have scored Line Breaker.

3 Scouts remaining

Pat scored this at the end
Final score including bonuses:
Admech: 9
Blood Angels: 6

Victory to the Admech!

First game against the Admech and man, they have a ton of shooting attacks. There was little you could really do to mitigate the shooting except to hide and stay out of Line of Sight. 30" from those Kataphrons make it hard to hide though and they each come with 2 wounds. They can dish out 15 shots per model, Grav. Hot sauce!

Looking forward to the next game.

Slowburn Month 2 and 3 Completed Works

As the month comes to a close and it is time for the Show and Tell at Titan Games, I have put the finishing touches on most of the models. Some models like the Drop Pod is getting an extra level of paint job owing to some scratches during game last week.

Because we skipped the Show and Tell for Month 2 owing to the 2v2 at ITE, we will be showcasing all our models for the 2 months of work, both Month 2 and 3. 

The Blood Born
Two months have passed since Sergeant Rayzor and his squad was thrown into the thick of fighting at Centraite Homeworlds. With the Magos Biologicos still missing, reinforcements were called in. 

Once arms were handed out to the squad and the unit was bolstered with Marines from the 3rd Company, High Priest Corbulo stepped off the Stormraven to acknowledge the Sergeants' efforts in pushing the war front. 


"Fear not brother, the Chapter provides."

Brother Corbulo and the armoured might of the Chapter
When pushed into a corner, the Blood Angels push back. The 'Blood of the Fallen' Sicaran Battle Tank is a reminder that great sacrifice must be made ensure the dominance of Man in the Galaxy.

Sicaran Tank called "Blood of the Fallen" 
Not sure why all the red in the pictures look so washed out. May have to look into a better camera! 

Immediate deployment option now opened to Sergeant Rayzor
Sergeant Gorro and his Assault Squad arrives to assist in the war efforts
Sergeant Gorro quickly rearms his Squad by swapping out the Heavy Flamers for another Meltagun. His squad's role would be penetrate deep into enemy territory, going for their hardest targets. This often meant that Squad Gorro would suffer catastrophic losses but their efforts have assisted with the success of multiple missions undertaken by the Chapter. 

A recent drop seeing the capture of ammo crates behind enemy lines, securing and arming the 3rd Company
The task force continued with the advance, seeking for their objective. In one gory battle, a hero emerged.
Brother Hiron
Inscription on his shoulder plate
Brother Hiron's unit disembarked from his Drop Pod together with Sergeant Gorro. It was deep in enemy territory and he had a desperate mission. Gorro opened fire on the Chimera hidden behind the ruins and managed to take it out with his Combo Melta. The Guardsmen realised the threat and opened up on the unit, taking everyone out except for Hiron. Brother Hiron threw himself through the wall, punching through the broken door and came face to face with the enemy Warlord. He fired with his Bolt Pistol and let out a resounding shout to the Emperor and charged in. Sanguinus was with him that day. The enemy was caught surprised by the moment and having seen what the embodiment of the Emperor could do, quaked. The enemy Warlord would have no more of this and fled the battlefield. Brother Hiron picked himself up, leaped up to take cover in the ruins. Mission was a success.

In the next month that followed, the enemy started throwing hordes of troops at the Angels of Death. What better way than to respond with our own.

Baal Predator of the 3rd Company - Angel's Wrath

Lemartes steps into the field with his Death Company

Razorback of the 3rd Company supporting Lemartes in his push


You've seen enough. BOOM! 

I hope you guys are happily painting and bringing a fully painted force to the table soon! Looking forward to seeing all!

For those of you who missed out on Month 1's Show and Tell, here is the story I wrote for my Kill Team.

Having just completed his stint with the Deathwatch, Sergeant Rayzor was thrown right back into the thick of fighting. Having almost no time to repaint his armor, Rayzor reported for duty within the day and immediately rejoined his old squad. There were new faces, recruits recently pulled in from the Scout squads of the 12th Company. Rayzor was to lead a small kill team comprising some veterans, some newer recruits and his specialists.

Agle is the team's Weapon Specialist. He can usually be seen carrying a vast array of Master Crafted weapons, polishing them to a fault. With a sharp eye he has finished his time with the 12th as a Marksman earning his nickname Eagle Eye.

Manny recently recovered from a major defeat at May Weather Court in the Elvee System rejoined his brethren a changed marine. Something within him snapped during the long campaign and what used to be a calm and collected individual is now a rash and feisty marine. He courts the death angel on every engagement and his brothers worry that he will slip into the abyss.

Harsh is the quiet and brooding brother of the squad. Moving silently for an 8 foot tall Marine clad in power armor seem impossible but Harsh treads as light as a feline. A weapon expert, he carries a tarpaulin under his power pack and can often be seen with extra heavy ammunition.

While the Kill Team are the executors of the Emperors Will, the Scouts of Sergeant Orion are the eyes. Relaying important tactical information back to Sergeant Rayzor, they work in tandem to ensure that each surgical strike lops off the threat at the source before it escalates. Concealed in camo cloaks, these Scouts operate silently but deadly.

LinkWithin

Related Posts Plugin for WordPress, Blogger...