Papa Nurgle paid me a visit last Friday and decided he would stay the weekend thus robbing me of the ability to take part in the ABOcalypse June 2014. I actually worked quite hard to get this fella ready for the event, even expediting the shipment of my base. Alas, the Emperor does not protect the Children of the Asuryan.
The last time you saw this model it was
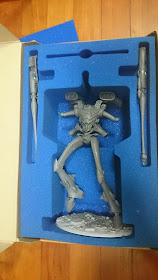
constructed and ready for paint. The only thing that was missing was a suitable base. I spent countless hours looking at local art stores for something that would fit into my KR Multicase and still have enough heft to prevent this behemoth from toppling over. I had to work within strict dimensions owing to the case I had pre-purchased for my Titan which was 114mm x 165mm. These dimensions closely resembled the Knight Titan base that GW recently launched.
In come Dragonforge. They have quite a large selection of resin bases from their largest which is 200mm to their smallest 25mm bases. I have gone for the
Urban Rubble Series simply because it fit best with my own basing technique.
 |
| The actual product looks exactly the same |
 |
| The base fit perfectly together with the Titan in the case |
The resin material gave the base enough weight preventing it from toppling over. While initially the plan was to grab an order from GW and add heavy washers below the base for cheap, I found that the Dragonforge base to be a better choice. I was able to drill into the resin to put the pin rooting the Revenant Titan to the base. While still quite fragile, the model can now stand on its own.
Whipped out the airbrush and started the painting process.
 |
| Primed the model white and the base black |
 |
| Kept these parts separate and primed them white. |
I chose to prime all purple parts white and all white parts gray. I would then highlight these gray parts to white using the airbrush first then cleaning it up with my paintbrush.
 |
| Preshading work on the upper half |
Mid-way through the preshade process the top part of the model actually came lose so I pulled the model apart. Blessing in disguise as it made it much easier to do the work that I needed to do.
I continue working in the pre-shade to all parts that would have stronger shadows such as panel lines, gems, joints and vents.
 |
| Lower body |
After all the preshading work is done comes the easy part. Keeping the airbrush about 2 feet away from the model and diluting the paint to 10:1 (water: paint), I sprayed the entire model in Warlord Purple (Vallejo). This was done in multiple layers until you can hardly see the black panel lines thus creating the shade.
 |
| The basecoated model |
While this model is far from finished, I was ready to bring this for the apoc game on Saturday but Papa Nurgle just kept passing his Leadership check while I continue to fail my roll. Nonetheless, work continues on this behemoth and it will be fully functional when it is my turn to organise the next ABOcalpse. Stay tuned!


No comments:
Post a Comment